Sidebar
projects:internetofthings:homeassistant
Table of Contents
Home Assistant
-
Install
- pip3 install urllib3==1.20 –upgrade –target ~/.homeassistant/deps/ (telegram notify solved)
upgrade
pip install -U homeassistant
and after restart home assistant
with fabric
hass
sudo apt install python3 python3-venv incron mc python3-dev libffi-dev libssl-dev
python3 -m venv ~/venv
. ~/venv/bin/activate
echo "source ~/venv/bin/activate" >> ~/.bashrc
pip install -U pip wheel
pip install homeassistant
service
- /etc/systemd/system/hass.service
[Unit]
Description=homeassistant
After=network.target

[Service]
Type=simple
User=pi
ExecStart=/home/pi/venv/bin/hass -c "/home/pi"

[Install]
WantedBy=multi-user.target
enable service
systemctl daemon-reload
systemctl enable hass
configuration example
sudo apt install git mc
git clone https://github.com/scipioni/home-assistant-example.git home-assistant-scipio
z-wave
Installazione ZWave su raspberry pi
opzionale, rimuovere docker se si hanno installazioni vecchie:
sudo apt-get purge -y docker-engine docker docker.io docker-ce docker-ce-cli
sudo apt-get autoremove -y --purge docker-engine docker docker.io docker-ce


sudo apt update
sudo apt install raspberrypi-kernel raspberrypi-kernel-headers
sudo apt install ca-certificates curl gnupg lsb-release

sudo mkdir -p /etc/apt/keyrings

curl -fsSL https://download.docker.com/linux/debian/gpg | sudo gpg --dearmor -o /etc/apt/keyrings/docker.gpg

echo "deb [arch=$(dpkg --print-architecture) signed-by=/etc/apt/keyrings/docker.gpg] https://download.docker.com/linux/debian $(lsb_release -cs) stable" | sudo tee /etc/apt/sources.list.d/docker.list > /dev/null

sudo apt-get update
sudo apt-get install docker-ce docker-ce-cli containerd.io docker-compose-plugin
(se ci sono errori dpkg, riprovare dopo un reboot)

sudo systemctl enable docker
sudo systemctl start docker

ls /dev/serial/by-id/
copiare il nome della chiavetta usb (es usb-0658_0200-if00)

mkdir zwave
cd zwave
wget https://raw.githubusercontent.com/zwave-js/zwavejs2mqtt/master/docker/docker-compose.yml
nano docker-compose.yml
incollare il nome della chiavetta al posto di "insert_stick_reference_here"
salvare

sudo docker compose up -d
Visitare http://ip-raspberry:8091
Andare sulle settings dal menu laterale
Sezione Zwave
serial port: lasciare /dev/zwave (la mappatura viene fatta dal docker compose)
generare tutte e 4 le chiavi, S2 e S0, premendo sui pulsanti con le frecce circolari
Sezione general
enable log
scorrere in basso
abilitare “disable MQTT gateway”
Sezione Home Assistant
Abilitare WS server
Salvare
Dall'interfaccia di home assistant installare l'integrazione ZwaveJS
Inserire come url:
ws://localhost:3000
Ora homeassistant è pronto per cercare nuovi dispositivi zwave, dalla schermata di configurazione dell'integrazione ZwaveJS
configurazioni z-wave vecchie
TKB Home TZ10.XX / TZ10.36 termostato <Product type="0201" id="0501" name="TZ10.XX Wall Thermostat" config="wenzhou/tz10.xml"/>
- /etc/udev/rules.d/local.conf
SUBSYSTEM=="tty", ACTION=="add", ATTRS{idVendor}=="0658", ATTRS{idProduct}=="0200", SYMLINK+="zwave"
Add to ~/lib/lib/python3.5/site-packages/pythonopenzwave/ozwconfig/manufacturer_specific.xml near <Manufacturer id=“0118” name=“Wenzhou TKB Control System”
>
<
code> <Product type=“0201” id=“0501” name=“TZ10.XX Wall Thermostat” config=“wenzhou/tz10.xml”/> </code>
wenzhou/tz10.xml
<?xml version="1.0" encoding="utf-8"?>
<Product xmlns='http://code.google.com/p/open-zwave/'>
   <!-- COMMAND_CLASS_BASIC does not respond to requests -->
  <CommandClass id="32" action="remove" />
  <!-- This thermostat's setpoint descriptions are 0 based -->
  <CommandClass id="66">
                <Value type="string" genre="user" instance="1" index="0" label="Operating State" units=" mode" value="Idle" />
  </CommandClass>
  <CommandClass id="67" base="0" override_precision="2" />
</Product>
reverse proxy
- /etc/nginx/sites-enabled/homeassistant
server {
    listen 80;
    server_name  "scipio.csgalileo.org";

    # create this folder empty
    location /.well-known/acme-challenge {
        root /var/www;
        allow all;
    }

    location / {
        return 301 https://$server_name$request_uri;
    }
}

server {
  listen 443 ssl;
  server_name  "scipio.csgalileo.org";
  ssl on;

  proxy_buffering off;
  location / {
    proxy_pass http://localhost:8123/;
    proxy_set_header Host $host;
  }

  ssl_certificate /etc/ssl/certs/scipio.csgalileo.org.cer;
  ssl_certificate_key /etc/ssl/private/scipio.csgalileo.org.key;
}
MQTT
apt install mosquitto
mosquitto_passwd /etc/mosquitto/pwfile scipio
zones
mosquitto_passwd /etc/mosquitto/pwfile simo
~/.homeassistant/known_devices.yaml
github
setup
git config --global push.default simple
git clone https://github.com/scipioni/home-assistant.git
cd home-assistant
git remote add upstream https://github.com/home-assistant/home-assistant.git
git fetch -v

# script/setup
create a branch with expected work
git branch telegram-webhooks
git checkout telegram-webhooks
git push --set-upstream origin telegram-webhooks
everyday work on branch
...
git add
git commit
git push
rebase before pull request
git fetch upstream dev
git rebase upstream/dev

# in case of conflicts
... edit conflicts
git add ...
git rebase --continue

# -f is necessary (Git will reject it because there isn't a direct path from the commit on the server to the commit on your branch)
git push -f
now in github project “new pull request”
github docs
git clone https://github.com/scipioni/home-assistant.git
cd home-assistant.github.io.git
git remote add upstream https://github.com/home-assistant/home-assistant.github.io.git
git fetch -v

# script/setup
create a branch with expected work
git branch telegram-webhooks
git checkout telegram-webhooks
git push --set-upstream origin telegram-webhooks
ruby
sudo apt install y ruby ruby-dev
sudo gem install bundler
cd home-assistant.github.io.git
bundle
rake generate
test site
rake preview
everyday work on branch
...
git add
git commit
git push
rebase before pull request
git fetch upstream next
git rebase upstream/next

# in case of conflicts
... edit conflicts
git add ...
git rebase --continue

# -f is necessary (Git will reject it because there isn't a direct path from the commit on the server to the commit on your branch)
git push -f
now in github project “new pull request”
motion
Install latest release from https://github.com/Motion-Project/motion
- /etc/motion/motion.conf
on_picture_save /usr/bin/motion-homeassistant %f
- /usr/bin/motion-homeassistant
#!/bin/sh

F=$1
ln -sf $(basename $F) $(dirname $F)/lastsnap.jpg
- config.yaml
camera:
  - platform: local_file
    name: soggiorno
    file_path: /media/usb0/photo/lastsnap.jpg
sensors
- /dev-service → zwave → setconfigparameter
disable LED on fibardo FGMS-001
{
"node_id": 3,
"parameter": 80,
"value": 0
}
Foscam IP camera
vlc rtsp://hass:password1@192.168.2.14:554/videoMain
automation
create a virtual switch
- input_boolean.yaml
motion_detected:
  name: Motion rilevato
  initial: off
  icon: mdi:run
we can turn on this virtual switch with as web service
curl -X POST -H "x-ha-access: xxx" -H "Content-Type: application/json" -d '{"state": "on"}' \
 http://localhost:8123/api/states/input_boolean.motion_detected
automation that reset virtual switch after 2 seconds
- automation/on-motion.yaml
alias: 'reset motion state'
trigger:
  platform: state
  entity_id: input_boolean.motion_detected
  to: 'on'
action:
  # after two seconds reset motion_detected state
  - delay: '00:00:02'
  - service: input_boolean.turn_off
    data:
      entity_id: input_boolean.motion_detected
camera motion
sudo apt install incron
echo hass > /etc/incron.allow
as hass user edit incron table 'incrontab -e' (incrontab -l to see)
/media/usb0/photo/C1_00626E611E80/snap/ IN_CLOSE_WRITE echo "$$ $@ $# $% $&"
grafana
Add influxdb datasource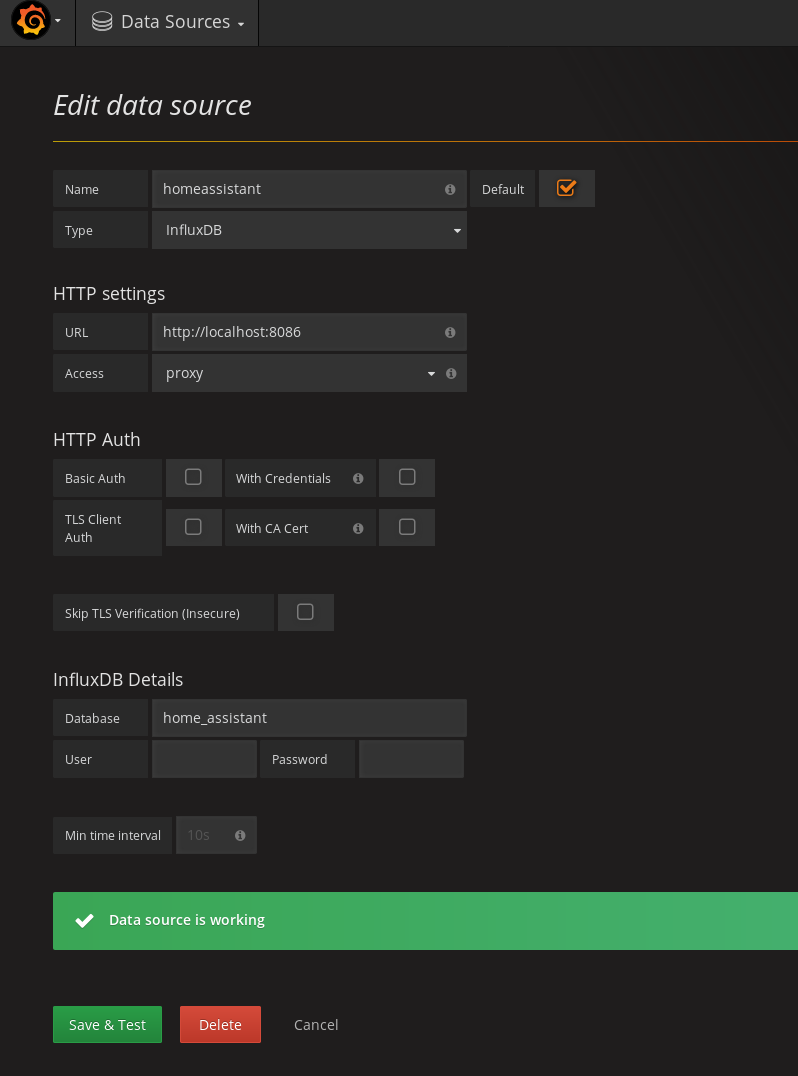
alexa
Modificare https://github.com/mike-grant/haaska per il multiclient.
haaska.py gira come servizio sui lambda server amazon. Anziché leggere la configurazione (ad esempio bearertoken) da file, prevedere una chiamata ad un web service esterno (ad esempio https://ha.csagalileo.org/alexa?client=id_client_alexa) da cui recuprare i dati. Ovviamente va mappato idclient_alexa con albertis
Sniffare i metodi:
- def get(self, endpoint):
- def post(self, endpoint, data, wait=False):
projects/internetofthings/homeassistant.txt · Last modified: by daniel