User Tools
Sidebar
projects:iotaiuto:doorbell
Book Creator
Add this page to your book
Add this page to your book
Book Creator
Remove this page from your book
Remove this page from your book
**This is an old revision of the document!**
Doorbell
Per la prima scrittura:
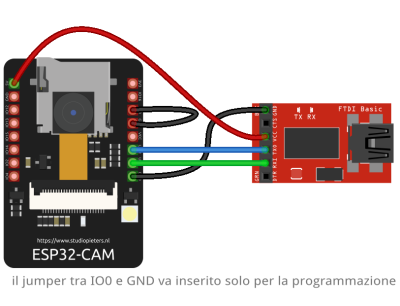
- connettere uno dei pin di IO a GND, come mostrato in figura
- attaccare l'USB
- dare i permessi alla porta, esempio:
chmod 660 /dev/ttyUSB0
- riavviare esphome
- uploadare la configurazione
Per le scritture wireless non serve che GND sia connesso a un pin di IO
Configurazione base per camera e led
esphome:
  name: doorbell
  platform: ESP32
  board: esp32dev

# Enable logging
logger:

# Enable Home Assistant API
api:

wifi:
  ssid: "wifi ssid"
  password: "password"

esp32_camera:
  external_clock:
    pin: GPIO0
    frequency: 20MHz
  i2c_pins:
    sda: GPIO26
    scl: GPIO27
  data_pins: [GPIO5, GPIO18, GPIO19, GPIO21, GPIO36, GPIO39, GPIO34, GPIO35]
  vsync_pin: GPIO25
  href_pin: GPIO23
  pixel_clock_pin: GPIO22
  power_down_pin: GPIO32
  name: doorbell camera

# Flashlight CHECK PIN
output:
  - platform: gpio
    pin: GPIO4
    id: gpio_4

light:
  - platform: binary
    output: gpio_4
    name: doorbell light

sensor:
  - platform: wifi_signal
    name: doorbell wifi signal
    update_interval: 30s
  - platform: uptime
    name: doorbell uptime
RTSP Server
Installazione del fork di esphome, che sostituirà esphome originale
mkdir esphome_rtsp
cd esphome_rtsp
git clone https://github.com/crossan007/esphome
cd esphome
checkout feature/rtsp-server
pip install .
esphome ~/config dashboard
Aggiungere alla configurazione di esp32cam:
esp32_camera:
  # id per rtsp server
  id: cam
  external_clock:
    pin: GPIO0
   ...
   ...

rtsp_server:
  port: 8675
  camera: cam
Visualizzare stream RTSP con VLC:
VLC menu -> Media -> Open network stream -> rtsp://indirizzo_ip_esp:8675
projects/iotaiuto/doorbell.1628782057.txt.gz · Last modified: by daniel

